I’ve been using light-sensitive dyes for many years – first Inko Dye and more recently Jacquard’s SolarFast dye. These bright, permanent dyes can be used for photographic images, but give great results for other uses too. And all the techniques can be combined to make complex images. This overview shows some of the methods, like photograms, shibori, and rolling color on over textures. I will be adding posts with step-by-step pictures of how they are done and comparing products.
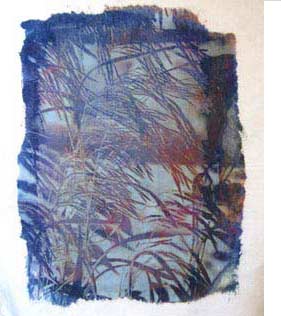 Light-sensitive dyes come in opaque plastic bottles, and in lots of colors. I mixed blue with several other colors of SolarFast dye on cotton, and exposed it with a photographic negative of grasses. Some SolarFast colors come out of the bottle very pale shades of the color. Others come out of the bottle with a bright yellow that will change as it is exposed to light, but will always have a yellow cast. None of the colors look like what you will get after it’s exposed to sunlight, so part of the fun is the surprise.
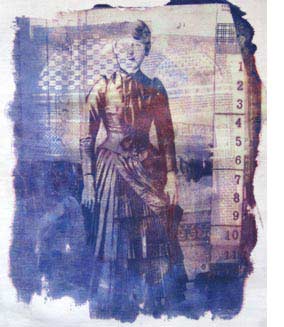 Two negatives were combined, one on top of the other — a vintage photo and one of a building. They were exposed with sunlight on cotton. The dark, uneven edge on the right side is where the negative didn’t cover the dye that was painted on. I especially like the edges that show how the dye was applied.
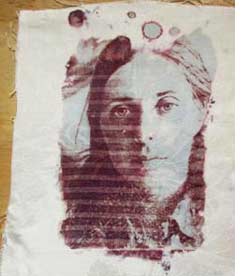 This photographic image was exposed with sunlight, after the dye was applied with a small roller. The spots at the top that are dark just around the edges were drops of dye. The sunlight couldn’t go through the thick dye, and it could only develop fully around the edge. A piece of glass was used to hold the negative tight against the cloth, and in this case, the glass had raised stripes across it that showed up in the final image.
After exposing with a negative, the cloth has to be washed very thoroughly to remove the unexposed dye from the parts of the image that were not affected by the light. Those parts sometimes show a pale cast. The dye was a mixture of blue and magenta, and left a light blue shade.
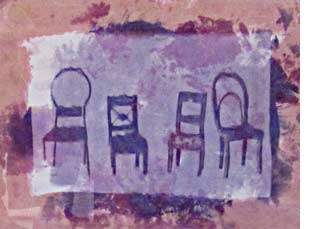 A piece of peach-colored silk with daubed with magenta-blue dye and then it was exposed with a rectangular negative (a photo of doll-house chairs) that didn’t cover all the dye.
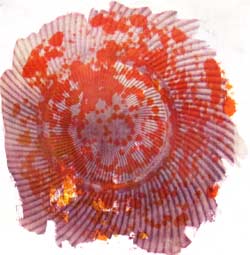
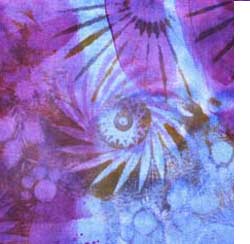 This is also Solarfast dye, but was done with a very different method. Textured surfaces were placed underneath the fabric that already had been dyed light blue and magenta — glass platters with raised designs or, in this case, a plastic serving tray with a pattern of spirals and flowers. And then several colors of dye were rolled on. The cloth was spread out in the sunshine for ten minutes for the dye to develop. With this technique, you don’t have to worry about washing out any unexposed dye — all the dye will be fully developed, and when you wash it, very little color should come off of it.
 This piece of fabric was exposed with a glass object on top of the fabric — a glass light fixture with a heavily textured bottom. The design is darker on one side because that’s the area that got the most sunlight. (The light shade was several inches high and cast a shadow over part of the dye).
You can also make photograms by placing objects on the dye. (A similar process is “sun-printing” done with thin fabric paint.) Leaves and other plant parts, as well as flat objects, work well. The result is a silhouette, and you can make it sharper by placing a piece of glass on top to get better contact.
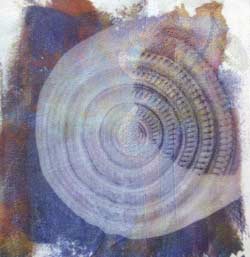
 Two methods are combined here. First the orange dye was rolled on the fabric by placing it on top of a textured glass plate, and then the fabric was developed in sunshine. Then, since the design was blobbier than I wanted, more dye was painted on and it was exposed again through a glass plate with a spiral design. The orange was fully developed since it was only on parts of the fabric; the lavender design was made by the sunlight coming through the glass, and unexposed dye had to be washed out to make the pattern permanent.
 The silk scarf was prepared with Arashi Shibori, wrapped on a PVC pipe, soaked in water, and then dyed by painting SolarFast dye on the crunched silk. The colors developed after the scarf was unwrapped and spread out in the sunlight.